The settings are listed roughly from top to bottom by how generally useful they are and how high their priority is.
Table of Contents
Open Table of Contents
- Windows Update
- Check the refresh rate
- Turn off mouse acceleration
- Change File Explorer to a more developer-friendly view
- Power mode
- Per-app GPU assignment
- Disable Fast Startup
- Game Mode
- Xbox Game Bar
- Settings for AMD CPUs
- Optimizations for windowed games
- Hardware-accelerated GPU scheduling
- Disable USB selective suspend
- Turn off keyboard accessibility features
- Disable automatic volume reduction during calls
- Turn off Enable audio enhancements
- Reduce background apps
- Turn off NIC power-saving settings
- NVIDIA Control Panel settings
- Install PowerToys
- Memory overclocking (XMP/EXPO)
- Enable TPM / Secure Boot
- Pin Windows Terminal as the default for CLI tools
- Do not sync with OneDrive
- Enable hardware-assisted virtualization
- Dev Drive
- Turn on Developer Mode
- Enable sudo
Windows Update
This is mandatory.
Check the refresh rate
This is one people often forget after changing PCs.
Settings → System → Display → Advanced display Select the maximum refresh rate your monitor can output.
Turn off mouse acceleration
This is another one people often forget after changing PCs.
Settings → Bluetooth & devices -> Mouse -> turn off Enhance pointer precision.
Change File Explorer to a more developer-friendly view
- Show file name extensions: ON
- Show hidden files: ON
Power mode
Settings → System → Power → Power mode
Set it to Best performance.
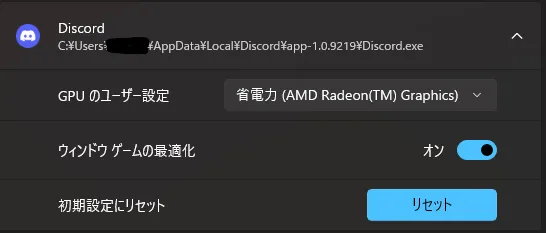
Per-app GPU assignment
Settings → System → Display → Graphics → Custom settings for applications
It is a good idea to manually specify that lightweight apps should use the integrated GPU. High-load apps such as games and 3D production software usually use the dedicated graphics card automatically, so you only need to add settings for apps you want to run on the integrated GPU. Also, configuring every single app is a pain, so it is fine to narrow it down to the apps you use often.
Disable Fast Startup
https://www.fmworld.net/cs/azbyclub/qanavi/jsp/qacontents.jsp?PID=2111-3152 The page above explains it clearly.
A Windows full shutdown → next startup can sometimes reset problems on the driver/kernel side, so in general it is better to perform a full shutdown. Fast Startup can skip those resets, so disabling it is the better choice.
I once had an M.2 SSD stop being detected after a restart. Restarting over and over did not fix it, but doing a full shutdown did.
Game Mode
Settings → Gaming → Game Mode
Turn it ON.
This is ON by default, but it is important, so check it.
Xbox Game Bar
Update Xbox Game Bar. https://apps.microsoft.com/detail/9nzkpstsnw4p?hl=ja-JP&gl=JP
You can also update it from Downloads and updates in the Microsoft Store.
Xbox Game Bar has functionality that lets Windows treat and remember an app as a “game,” and it is involved in applying gaming-oriented features such as Game Mode.
It makes CPU/OS-side gaming scheduling and optimizations easier to apply, such as Ryzen X3D 3D V-Cache optimization and Intel Thread Director integration, so keep it up to date.
Turn off Game Bar background recording
Settings -> Gaming -> Captures
Turn Record what happened OFF.
Background recording makes things heavier, so turn it OFF. If you want background recording, it is better to use OBS or NVIDIA/Steam features.
Settings for AMD CPUs
For people using Ryzen X3D models with 3D V-Cache.
I am including this here because it relates to Game Mode and Xbox Game Bar, but the priority is low because the steps are numerous and difficult.
The video below is easy to understand.
Optimizations for windowed games
Settings → System → Display → Graphics
Turn Optimizations for windowed games ON.
Note: This is ON by default, but if certain games stutter for you, turning it OFF is a good idea. It is not a bad setting, but it can have bad compatibility with specific environments or games.
Hardware-accelerated GPU scheduling
Settings → System → Display → Graphics → Advanced graphics settings
Turn Hardware-accelerated GPU scheduling ON.
Note: This is ON by default, but if certain games stutter for you, turning it OFF is a good idea. It is not a bad setting, but it can have bad compatibility with specific environments or games.
Disable USB selective suspend
https://www2.mouse-jp.co.jp/ssl/user_support2/sc_faq_documents.asp?FaqID=23233 The page above explains it clearly.
This prevents momentary dropouts of controllers and USB devices caused by power-saving settings. It is mandatory for people who use pads, arcade sticks, and similar controllers in fighting games and the like.
Turn off keyboard accessibility features
Settings → Accessibility → Keyboard
- Sticky Keys: Off
- Filter Keys: Off
- Toggle Keys: Off
Turn off the Sticky Keys popup
Settings → Accessibility → Keyboard -> Sticky Keys
Pressing the Shift key five times shows a confirmation popup asking whether to use Sticky Keys, but having this appear during a game is annoying, so turn it off.
Disable automatic volume reduction during calls
System -> Sound -> More sound settings -> Communications -> Do nothing
This prevents game audio or music from being lowered automatically during calls in apps like Discord.
Turn off Enable audio enhancements
Open the properties for the microphone you are using from the Recording tab in the Sound Control Panel, then uncheck Enable audio enhancements in the Advanced tab and press OK.
It is better to consolidate microphone noise suppression in one place.
Using a dedicated app such as Nvidia Broadcast, or using Discord’s built-in features, lets you apply only the suppression you need where you need it, and the audio quality will be optimized too.
If you stack multiple noise-suppression systems, your voice tends to cut out.
Reduce background apps
From Task Manager → Startup, disable unnecessary startup apps. Common defaults like OneDrive can be turned OFF if you do not use them.
Turn off NIC power-saving settings
NIC power management
Device Manager → Network adapters → Power Management Turn OFF “Allow the computer to turn off this device to save power.”
NIC advanced settings
Device Manager → Network adapters → target NIC → Properties → Advanced
Energy Efficient Ethernet (EEE): Disabled Advanced EEE: Disabled Green Ethernet: Disabled Power Saving Mode: Disabled
Also refer to my article How reviewing NIC power-saving settings fixed my network issues.
NVIDIA Control Panel settings
This is a matter of preference. Maybe just copy the settings of your favorite pro gamer or something. (lol)
Personally, I recommend the default settings, but I think it is fine to change them if you understand what each setting does and how it affects things.
Articles I referred to:
- Manage 3D Settings
- System Memory Fallback for Stable Diffusion
- How PROS Optimize Nvidia Control Panel For Gaming! 🔧 (Boost FPS & Zero Delay)
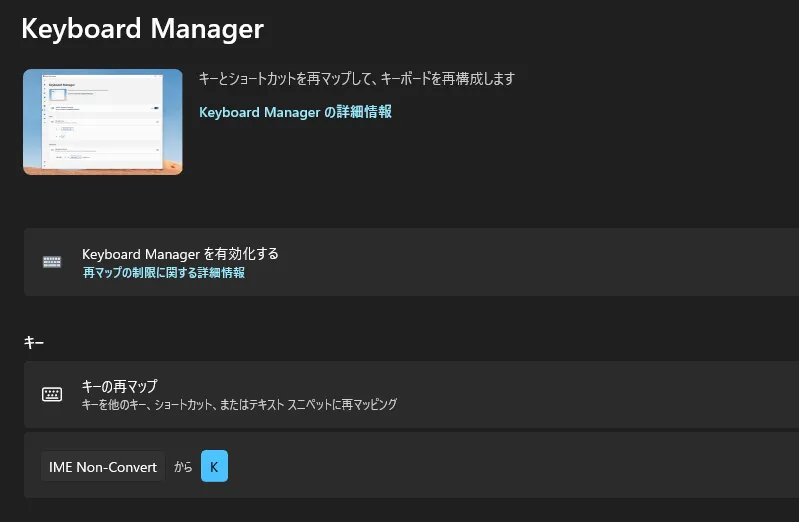
Install PowerToys
A bundle of official Windows utilities that feel like “it would be nice if Windows had this.”
For example, PowerToys’s Keyboard Manager can remap keys.
I never use the Non-Conversion key, so assigning it to some other key gives me more keys I can operate with my thumb, which is convenient because I can use the Non-Conversion key in games.
(In the settings below, I make the Non-Conversion key usable as the in-game voice chat toggle key.)
PowerToys Run is also extremely convenient. If you always search Windows by typing the name of the app you want to launch, you should switch to PowerToys Run. If you neatly arrange shortcut icons on the desktop and basically only launch apps from there, I think you do not need to install it.
Memory overclocking (XMP/EXPO)
You need to enter the BIOS, so if that does not ring a bell, it is fine to skip this. This is for people who are somewhat comfortable working with PCs. Enable XMP/EXPO from DRAM Profile Configuration. When you enable XMP/EXPO, the optimal high-clock, low-latency settings for the memory you bought are applied automatically.
XMP is for Intel and EXPO is for AMD. (Just in case.) The video below is easy to understand.
Enable TPM / Secure Boot
This improves security, and it also lets future OS requirements and features work properly. More titles, such as Valorant and BF6, are starting to require these. If you are buying a new PC from now on, they may already be ON by default.
Pin Windows Terminal as the default for CLI tools
It is genuinely convenient. You can install it from the Microsoft Store.
Settings -> System -> Advanced settings
Select Windows Terminal from Terminal.
Do not sync with OneDrive
Because file locking and large numbers of updates can make things heavy, I think people who do not use OneDrive can turn automatic sync completely OFF. I only enable sync for truly important directories such as .ssh.
Enable hardware-assisted virtualization
Enable CPU hardware-assisted virtualization (Intel VT-x / AMD-V (SVM)) in UEFI/BIOS.
This is mandatory for people who use WSL2 / Docker / Hyper-V for development, or who want to speed up emulators such as BlueStacks and NoxPlayer.
Dev Drive
This is an advanced setting.
Settings -> System -> Advanced settings -> Create a Dev Drive
Using it as a location for development directories such as GitHub repos, package caches, build artifacts, and working directories, or for work involving large numbers of files such as extracting MOD packs, regenerating shader/cache files, writing replays/logs/screenshots, and temporary files for recording or video editing, can make work more comfortable.
If you do not understand how it works, it is better not to force yourself to use it.
Turn on Developer Mode
This is an advanced setting.
Settings -> System -> Advanced settings
Turn on Developer Mode.
This is for people who install and test unsigned apps, such as apps in development or testing. If you do not understand how it works, it is better not to force yourself to use it.
Enable sudo
This is an advanced setting.
Settings -> System -> Advanced settings
Turn on Enable sudo.
This is for people who regularly use commands that require administrator privileges. If you do not understand how it works, it is better not to force yourself to use it.
![[GUNDAM EVOLUTION] How to Get More FPS Even on a Low-Spec CPU](https://blog.devkey.jp/en/posts/gundam-evolution-fps-optimization/index.png)
![[Deadlock] How to Set a Maximum FPS Limit](https://blog.devkey.jp/en/posts/deadlock-fps-max-launch-options/index.png)