My environment
- Windows 11
- VSCode
- Git Bash (Git for Windows)
- mise
Prepare VSCode and Git Bash
Install VSCode and Git for Windows (Git Bash).
If you are installing Git for Windows now, checking Add a Git Bash Profile to Windows Terminal will add a Git Bash profile to Windows Terminal, which makes things easier. (It will also be reflected in VSCode automatically. VSCode seems to detect it nicely.)
If you want to make Git Bash the default profile in VSCode, choose Git Bash from Select Default Profile.
Install mise
You can do this from the Git Bash you prepared above. Install it as described on the official site: https://mise.jdx.dev/getting-started.html
winget install jdx.miseAfter restarting, verify from Git Bash:
mise --versionInstall the Mise VSCode extension (recommended)
Installing this makes it easy to manage versions and see what is installed from inside VSCode, so it is really convenient.
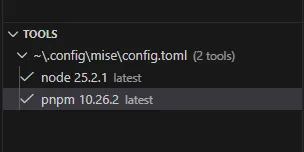
Then just install node and pnpm
If you omit @vesion, latest will be installed.
mise use -g node@22
mise use -g pnpm@10
After restarting, verify from Git Bash:
node -v
pnpm -v
Summary
Even on Windows + VSCode + Git Bash, mise lets you comfortably manage Node.js / pnpm and similar tools. If you install CLI tools directly, you will definitely forget which versions you installed in the future, and you will not be able to manage them either, so I recommend installing mise!
![[Deadlock] What I Learned from Creating a Japanese Localization Config Used by 50,000 Players](https://blog.devkey.jp/en/posts/deadlock-japanese-lessons-learned/index.png)

![[Deadlock] How to Play in Japanese [Japanese Localization Config File Download]](https://blog.devkey.jp/en/posts/launching-deadlock-japanese-settings/index.png)